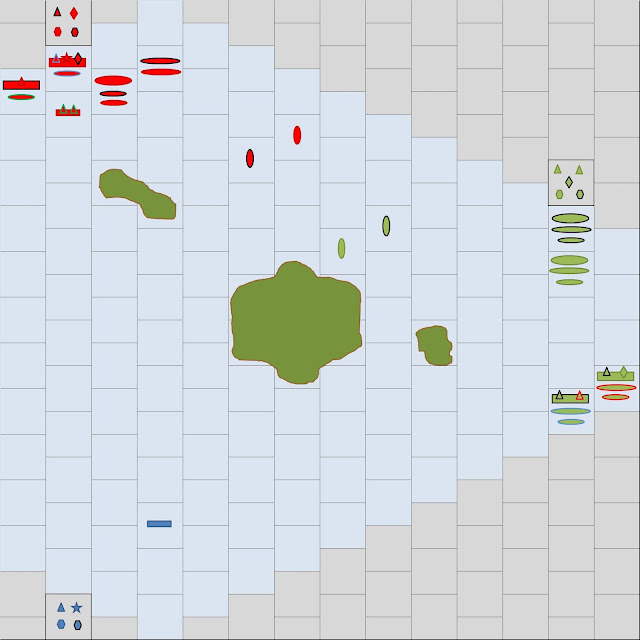
Initial Deployment: All three nations competing for the valuable territory in the center. Both the British and Japanese bring strong fleets while the Germans bring a token spoiling force.
Turn 1: The warships of the two fleets advance on each other, prepared to defend against the impending air strikes. British fighters down the B5Ns and a detachment of Sea Planes while British flak downs the Nells. Japanese fighters down the Sunderlands and a squadron of Hurricanes. The German air strike cripples the HMS Trinidad with two bomb hits and the Sakawa is hit by British bombs.
Turn 2: With four carriers in the battle, the air strikes are still potent and the Japanese succeed in landing a vital hit on the crippled HMS Trinidad. The Yamato hits the HMS Nelson and the Hatsukaze lays smoke to protect from return fire and the approaching submarines. Concealment saves the Yamato from a hit by the N3's main guns, but not from a torpedo from the HMS Tetrarch.
Turn 3:The Japanese destroyers swarm over the British submarines, hoping to silence them, resulting in a massive air battle overhead. The flak from one of the HMS Tynedales downs the squadron of Jeans, but the air attacks are more effective in the main event, where the Hatsukaze is crippled by bombs from Hurricane IICs and the HMS Trident is crippled by the Emilys. The combined ASW from the Japanese destroyers sinks both British submarines before they can get off another shot.
Turn 4: The warships finally close to combat range as the land based air is returning for a second strike. The Germans, still unsure how the battle will play out, withhold their attacks, but the British attack with full intensity. The Japanese focus their aircraft on defense, even holding back a couple of attack aircraft. Japanese fighters down a squadron of Martlets but the Hurricane IICs get through and crippled the Shiranui. Smoke and fire fills the air as the two sides fire everything they have at each other. The Japanese Long Lance torpedoes all miss, but Japanese gunnery is able to crippled the HMS Gurkha and hit the HMS Carlisle. The British fire is far more effective, sinking two Destroyers, crippling another two, and scoring hits on the Kinugase and Yamato.
Turn 5: The British, now outgunning their opponent, backs off to maintain the range while the Japanese attempt to close. Seeing the British with a significant advantage now, the Germans launch their air against them. Flak from the HMS Nelson splashes a squadron of Stukas but the battleship is unable to avoid a torpedo hit from the Ju88s. The squadron of Vals finishes off the HMS Gurkha. The Sakawa performs well, crippling the HMS Carlisle with her guns and the HMS Nelson with a torpedo hit and the Kinugasa follows this up by sinking the Carlisle. Again, the British fire is even more effective, sinking both cruisers, crippling the last Japanese destroyer, and hitting the Chitose. The N3 gives the most telling blow, getting a vital hit on the Yamato, sinking her. The British celebration is short lived as the I-25 finishes off the HMS Nelson.
Turn 6: Her warships all but gone, the Japanese retreat and the British give cautious chase, sending their remaining destroyers as a screen. The HMS Mohawk uses Sub Hunter to go after the I-26. The Japanese fighters down the squadron of Swordfish while the Vals get a vital bomb hit on an HMS Tynedale. Japanese gunnery sinks the HMS Mohawk, but not before it cripples the I-26. The HMS Kent sinks the last Japanese destroyer.
Conclusion: The British ASW assets depleted, they let the Japanese (and the Germans) retreat, leaving them in firm control of the valuable sector. It was a costly victory, though with a battleship, 2 cruisers, 3 destroyers, 2 submarines, and 5 squadrons of aircraft lost. The Japanese defeat was almost as costly with a battleship, 2 cruisers, 4 destroyers, and 2 squadrons of combat aircraft lost. Even the Germans lost a squadron of dive bombers.


No comments:
Post a Comment